Tutorial – How
to use ODI callback web services in conjunction with Oracle
Asynchronous BPEL
ODI 11.1.1.5.0
introduced the callback web service paradigm to ODI inbound web
services. The concept is similar to the asynchronous pattern in
JAX-WS. One difference here is that there is an explicit port type
for receiving the callback, once the original web service invocation
has completed processing. Also no connections are kept open or alive once the original invocation has been done. Let us go through the whole process of
creating a SOA Application and SOA Project that calls out to ODI web
service to invoke an ODI Scenario and then receive a response once
the Scenario run is complete.
Prerequisites:
- There must already be set up a Weblogic domain with SOA managed server
- You will also need either a Standalone ODI Agent or an ODI managed server under a Weblogic domain.
- You will need an installation of JDeveloper with SOA extension.
- The SOA managed server must be set up as a deployment target in JDeveloper
- Oracle Enterprise Manager must be set up on the Weblogic Admin server for the SOA managed server.
Let us start off with
creating an application. I am choosing a SOA Application. You can
also choose a Generic Application and configure the Project with
requisite technologies.

Choose OK to go to the
next page of the wizard. Here you will configure the application
name, the directory in which the application files will be stored, as
well as the package prefix for the application files. Choose some
descriptive names.

Choose Next to
continue. Here you can choose the technologies. SOA will already be
selected. Add Web Services, XML.

Choose Next. Accept the
defaults here unless you really want to configure specific values for
the project.

Choose Next.

Here I have chosen to
have an empty composite. It is easier this way for maximum
flexibility. Once you click Finish, the application is created and
the composite is opened.
Open the Component
Palette, scroll down click and drag Web Services onto the 'External
References' swimlane. A dialog will open up.
The dialog is quite
self-explanatory. It is here that we need to set up reference to
ODI's inbound web services. For this you need to know the URL to your
ODI inbound web service. If this is your default agent deployment
using the static Weblogic deployment template provided along with ODI
install, the URL will be
http(s)://:/oraclediagent/OdiInvoke?WSDL
where and are the ones for your ODI managed
server.
If you are using ODI
Standalone agent, this will be of same format.
If you have created the
ODI agent using a dynamic template that you created or you have
customized the web application's name, you will have to find out the
exact string in place of 'oraclediagent'. You can use Weblogic
administration console or Oracle Enterprise Manager to help you find
the exact WSDL URL.

In my case ODI is
deployed using the static template with default web application name.
So pointing to http://localhost:8001/oraclediagent/OdiInvoke?WSDL

See the result above.
The Port Type has been set to 'requestPortType' and Callback Port
Type has been set to 'requestPortTypeCallback'. This is in keeping
with Oracle Asynchronous Web Service pattern. Additionally I have
chosen to copy the WSDL and associated artifacts to the project so
that the schema types defined in the WSDL will be readily available.
Since we are targeting a static WSDL, this choice is fine.
Once you click OK a new
page will be shown asking to 'Localize Files' This is to let you
store the WSDL file local to the project. Choose OK here also.
See the result below.
ODI web service shows up in the External References swimlane. It is
time to add a BPEL process now.

From the Component
Palette drag-drop BPEL Process (or you can right-click in the center
swimlane and choose Insert → BPEL Process). The following dialog
opens up.

Note the default
choices for BPEL 1.1 and asynchronous BPEL process. Do not change the
asynchronous choice to synchronous. You are going to invoke an
asynchronous web service. The calls can only be from asynchronous →
asynchronous.
You can change the name
for the BPEL process. Make sure that 'Expose as a SOAP service' is
checked so that you can easily test this BPEL.
Also since this is a
simple BPEL process, the input type is being set to ODI web services
input type for the operation to start a Scenario and the output to
the operation's output type.
Click on the search
icon to the right of the 'Input' field and navigate to
OdiStartScenWithCallbackRequest type. See the image below.

In the same way
navigate to OdiStartScenResponse for the output type. Note that the
input type has an additional “..WithCallback...” component in the
name. This is not an error.
See the final result
below.

This is how the
composite will look now.

Now we need to connect
the BPEL with the configured ODICallbackSvc external reference to ODI
inbound web service. For this bring the mouse over the
'InvokeODIWithCallback' BPEL representation in the center swimlane.
Two circles with arrows inside them will show up on the lower left
and lower right corners of the box. Drag from here to the green
double empty arrows on ODICallbackSvc in the External References
swimlane.
See the result in the
following image.

So far we have been
operating on the composite. Now it is time to work on the BPEL
itself. Double-click on the 'InvokeODIWithCallback' box in the center
swimlane. The BPEL editor will open up.
The following is what
you will see. As you can see the ODI inbound web service again shows
up, this time as a Partner Link. Now we need to set up BPEL process
to send message to the web service and then receive asynchronous
callback from the web service.

Drag-drop an Assign
activity and Invoke activity, in that order, immediately after the
'receiveInput' activity. The Assign activity is for us to take the
input and pass it on. Invoke activity will invoke the web service
with this assigned value.

Mouse-over the Invoke
activity and drag-drop from one of the arrows to OdiCallbackSvc on
the right. A dialog to configure the Invoke activity opens.
Here you can choose the
operation to be invoked as well as the input and output variables.
Choose 'InvokeStartScenWithCallback' as the operation to be invoked.
You will see that only the Input is active. Output is grayed out.
This is because the output is going to to come via the callback. The
response to the invocation is just an 'OK' message. It is a oneway
SOAP operation.


Now we need to set up
the input. For this click on the '+' sign on the right of the 'Input'
field. A dialog with an automatically created variable name and the
variable type required by ODI inbound web service invocation will pop
up.

Choose OK both to this
dialog as well as the Edit Invoke dialog.
Now we need to use the
Assign activity to pass on the input to the BPEL process to this
variable. For this double-click the Assign activity. In the resulting
dialog expand the input to BPEL on the left pane and the variable
created above on the right pane and do mapping.

Choose OK.
Now let us create a
Java activity.
For this expand 'Oracle
Constructs' in the Component Palette and drag-drop Java Embedding
activity immediately after the Invoke activity.
Double-click the Java
Embedding activity and enter the following code. This will create
file whose timestamp we can verify.
java.io.File
tempFile = new java.io.File(System.getProperty("java.io.tmpdir")
+ java.io.File.separatorChar + "time.txt"));
try
{
if(tempFile.exists())
tempFile.delete();
else
tempFile.createNewFile();
}
catch (java.io.IOException ioe {}
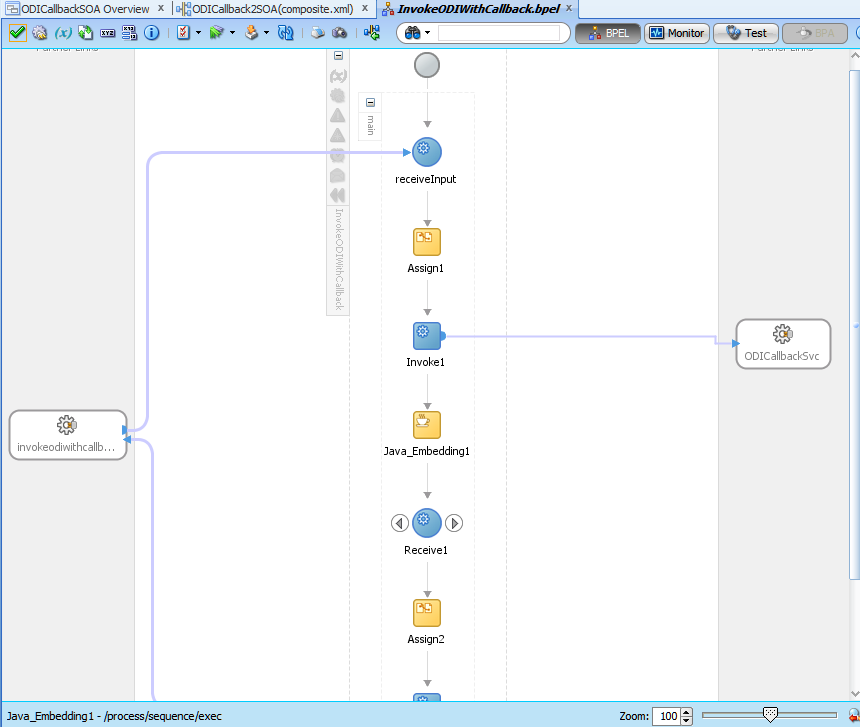
Now again expand 'BPEL
Constructs' in the Component Palette and drag-drop A Receive activity
followed by an Assign activity right after the Java Embedding
activity.
The following image
shows how the BPEL process looks now.
Now drag from the arrow
on the Receive activity to OdiCallbackSvc. The following dialog is
shown. Note that there are only two operations to choose from. ODI
inbound web service has callback only for starting a Scenario and
restarting a Session. Operations involving Loadplan are always
asynchronous, so they do not have callbacks. Client has to poll for
the status.

Note that there is only
one 'Variable' field and no Input/Output. The Receive activity only
only receives data so there is no other field. As with the Invoke
activity click the '+' sign to the right of the field and accept the
result.
Now we need to assign
this received data to the output of the BPEL process. For this
double-click the Assign activity after the Receive activity, expand
the variable that was created above on the left-hand pane and the
outputVariable on the right-hand pane and do mapping.

In the Application
Navigator right-click the Project and choose to deploy it.

Choose to deploy to an
Application Server. This is the SOA managed server that user must
already have set up.

Choose Next.

I have chosen to overwrite existing
composites with same revision ID. Choose Next.

'SOA-ODI' is the SOA
managed server that I have configured. Choose Next.

Now click 'Finish'. It
will build and deploy the Project to the SOA server.
Open a web browser and
enter the URL for Enterprise Manager on the Weblogic Admin server.
Navigate to SOA → soa-infra → ODICallback2SOA. Then from the top
SOA Composite menu, choose Test Service → the SOAP service
endpoint for the BPEL process.

Be sure to choose the
correct endpoint. By default it gets set to OdiInvokeCallback. You
do not want this.

Rather choose the BPEL
SOAP end point. Enter the required values for ODI Scenario
invocation. My Scenario issues a 'beep' and then 'sleeps' for 10
secs.
Click 'Test Web
Service' button.

Do not be scared. There
was no response because the BPEL process is itself an asynchronous
process. Click the Launch Flow Trace button. You will see the
following:

For clarity I have
removed the sandwiched Java_Embedding1 activity information. If you
go to your 'temp' directory and look at the timestamp of 'time.txt'
file you will find its timestamp to be same as the ending time for
the Invoke1 activity.
Congratulations! You have created a BPEL process that will start off an ODI Session, go on and do some other things while letting the ODI Session run and at the end of the Session, ODI will call the BPEL process back with the Session ID.