Tuesday, April 2, 2013

What is new for ODI XML JDBC driver in Oracle Fusion Middleware 11g R1 (11.1.1.7.0)

ODI XML driver issues

ODI XML driver had several issues such as
  1. would not support elements with same name but different types. For example a local element with same namespace URI and local name as a global variable would not be handled.
  2. does not support list/union simpleTypes, any, anyType, mixed type and so on.
In ODI 11.1.1.7.0 a new compatibility mode parameter has been added. This is an XML driver property called 'compat_mode'. Its default value is 'v2'. But if you specify the value 'v3' for this parameter, you can avoid issue (1). As you might imagine, if you use 'v3' for the value of this parameter, you will run across some changes in the behaviour of the driver.

Differences between 'v2' and 'v3' modes

  1. Handling of elements with same local name and resolved type. In current XML driver, data from such elements end up stored in the same table, but the rows have different FK references. With default mode, we will use different tables to store the elements. This has implication for elements that are 'ref's of a global element. Each of the reference (and descendants) gets its own table.
  2. Determining the root element. The XML JDBC driver allows users to specify the local name of the root element, and not a qualified name. One plain assumption here is that the root element has a unique local name. In 'v2' mode, if a root element name is not specified then the first element encountered by the parser is set as root element. This is the first element from the XSD hierarchy where the XSD does not have an 'include' or 'import'. In 'v3' mode this is indeterminate. The XSD should either have only one global element or user must specify the name of the element to be used as root. Failing this, one of the global elements from one of the target namespaces is used as root.
  3. As a corollary to (2), only a global element is allowed to be used as root element. Old parser would allow use of even local elements. This is carry-over from DTD times where all elements are global elements. If user specifies a local element name (which also is not the same a global element name) then an exception is raised. Note that for the old parser, if the user had provided an XSD, then the restriction applies that root element must be a global element.
  4. When using a DTD/specifying XML driver URL parameter to generate DTD, user must provide root element name. The new XML driver converts the DTD to XSD in-memory and uses this XSD to construct the data model. This conversion requires that a root element be specified. However, DTDs that are for XML structures that need to use namespaces must continue to use 'v2' mode.

Note that since JMS XML Queue/Topic drivers and Complex File driver uses XML driver internally, these drivers will also accept 'compat_mode' parameter. 11g JMS XML driver though, will not accept this parameter. It only supports a subset of XML driver parameters. Starting from 12c this is not the case

Thursday, March 7, 2013

Use BPEL callback to asynchronously get result from ODI


Tutorial – How to use ODI callback web services in conjunction with Oracle Asynchronous BPEL

ODI 11.1.1.5.0 introduced the callback web service paradigm to ODI inbound web services. The concept is similar to the asynchronous pattern in JAX-WS. One difference here is that there is an explicit port type for receiving the callback, once the original web service invocation has completed processing. Also no connections are kept open or alive once the original invocation has been done. Let us go through the whole process of creating a SOA Application and SOA Project that calls out to ODI web service to invoke an ODI Scenario and then receive a response once the Scenario run is complete.

Prerequisites:
  • There must already be set up a Weblogic domain with SOA managed server
  • You will also need either a Standalone ODI Agent or an ODI managed server under a Weblogic domain.
  • You will need an installation of JDeveloper with SOA extension.
  • The SOA managed server must be set up as a deployment target in JDeveloper
  • Oracle Enterprise Manager must be set up on the Weblogic Admin server for the SOA managed server.

Let us start off with creating an application. I am choosing a SOA Application. You can also choose a Generic Application and configure the Project with requisite technologies.


Choose OK to go to the next page of the wizard. Here you will configure the application name, the directory in which the application files will be stored, as well as the package prefix for the application files. Choose some descriptive names.


Choose Next to continue. Here you can choose the technologies. SOA will already be selected. Add Web Services, XML.


Choose Next. Accept the defaults here unless you really want to configure specific values for the project.


Choose Next.


Here I have chosen to have an empty composite. It is easier this way for maximum flexibility. Once you click Finish, the application is created and the composite is opened.

Open the Component Palette, scroll down click and drag Web Services onto the 'External References' swimlane. A dialog will open up.

The dialog is quite self-explanatory. It is here that we need to set up reference to ODI's inbound web services. For this you need to know the URL to your ODI inbound web service. If this is your default agent deployment using the static Weblogic deployment template provided along with ODI install, the URL will be http(s)://:/oraclediagent/OdiInvoke?WSDL where and are the ones for your ODI managed server.

If you are using ODI Standalone agent, this will be of same format.

If you have created the ODI agent using a dynamic template that you created or you have customized the web application's name, you will have to find out the exact string in place of 'oraclediagent'. You can use Weblogic administration console or Oracle Enterprise Manager to help you find the exact WSDL URL.


In my case ODI is deployed using the static template with default web application name. So pointing to http://localhost:8001/oraclediagent/OdiInvoke?WSDL


See the result above. The Port Type has been set to 'requestPortType' and Callback Port Type has been set to 'requestPortTypeCallback'. This is in keeping with Oracle Asynchronous Web Service pattern. Additionally I have chosen to copy the WSDL and associated artifacts to the project so that the schema types defined in the WSDL will be readily available. Since we are targeting a static WSDL, this choice is fine.

Once you click OK a new page will be shown asking to 'Localize Files' This is to let you store the WSDL file local to the project. Choose OK here also.

See the result below. ODI web service shows up in the External References swimlane. It is time to add a BPEL process now.


From the Component Palette drag-drop BPEL Process (or you can right-click in the center swimlane and choose Insert → BPEL Process). The following dialog opens up.


Note the default choices for BPEL 1.1 and asynchronous BPEL process. Do not change the asynchronous choice to synchronous. You are going to invoke an asynchronous web service. The calls can only be from asynchronous → asynchronous.

You can change the name for the BPEL process. Make sure that 'Expose as a SOAP service' is checked so that you can easily test this BPEL.

Also since this is a simple BPEL process, the input type is being set to ODI web services input type for the operation to start a Scenario and the output to the operation's output type.

Click on the search icon to the right of the 'Input' field and navigate to OdiStartScenWithCallbackRequest type. See the image below.


In the same way navigate to OdiStartScenResponse for the output type. Note that the input type has an additional “..WithCallback...” component in the name. This is not an error.

See the final result below.


This is how the composite will look now.


Now we need to connect the BPEL with the configured ODICallbackSvc external reference to ODI inbound web service. For this bring the mouse over the 'InvokeODIWithCallback' BPEL representation in the center swimlane. Two circles with arrows inside them will show up on the lower left and lower right corners of the box. Drag from here to the green double empty arrows on ODICallbackSvc in the External References swimlane.

See the result in the following image.


So far we have been operating on the composite. Now it is time to work on the BPEL itself. Double-click on the 'InvokeODIWithCallback' box in the center swimlane. The BPEL editor will open up.

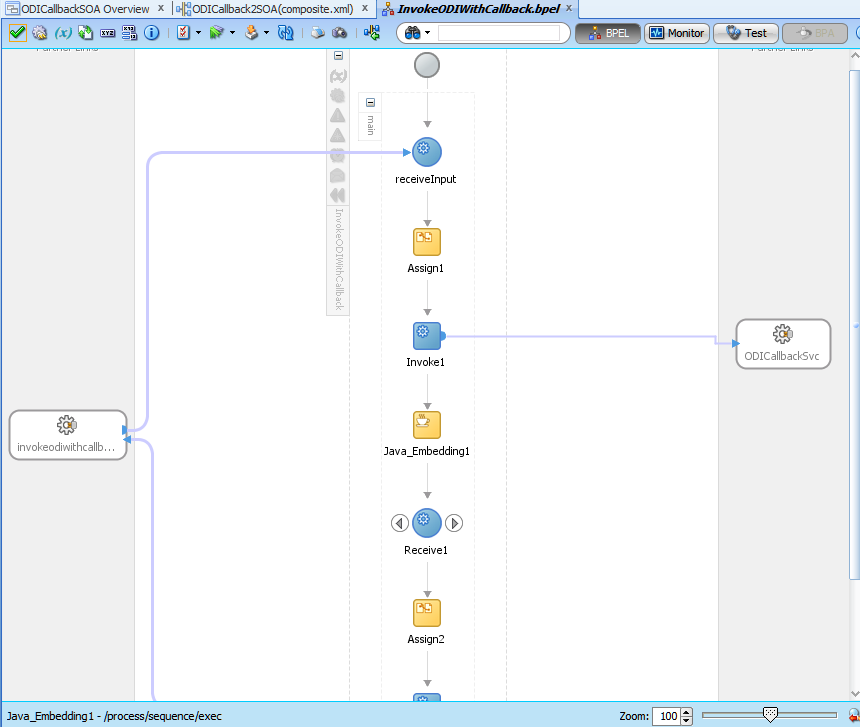
The following is what you will see. As you can see the ODI inbound web service again shows up, this time as a Partner Link. Now we need to set up BPEL process to send message to the web service and then receive asynchronous callback from the web service.


Drag-drop an Assign activity and Invoke activity, in that order, immediately after the 'receiveInput' activity. The Assign activity is for us to take the input and pass it on. Invoke activity will invoke the web service with this assigned value.


Mouse-over the Invoke activity and drag-drop from one of the arrows to OdiCallbackSvc on the right. A dialog to configure the Invoke activity opens.

Here you can choose the operation to be invoked as well as the input and output variables. Choose 'InvokeStartScenWithCallback' as the operation to be invoked. You will see that only the Input is active. Output is grayed out. This is because the output is going to to come via the callback. The response to the invocation is just an 'OK' message. It is a oneway SOAP operation.


Now we need to set up the input. For this click on the '+' sign on the right of the 'Input' field. A dialog with an automatically created variable name and the variable type required by ODI inbound web service invocation will pop up.


Choose OK both to this dialog as well as the Edit Invoke dialog.

Now we need to use the Assign activity to pass on the input to the BPEL process to this variable. For this double-click the Assign activity. In the resulting dialog expand the input to BPEL on the left pane and the variable created above on the right pane and do mapping.


Choose OK.

Now let us create a Java activity.

For this expand 'Oracle Constructs' in the Component Palette and drag-drop Java Embedding activity immediately after the Invoke activity.


Double-click the Java Embedding activity and enter the following code. This will create file whose timestamp we can verify.

java.io.File tempFile = new java.io.File(System.getProperty("java.io.tmpdir") + java.io.File.separatorChar + "time.txt"));
try {
if(tempFile.exists())
tempFile.delete();
else
tempFile.createNewFile();
} catch (java.io.IOException ioe {}

Now again expand 'BPEL Constructs' in the Component Palette and drag-drop A Receive activity followed by an Assign activity right after the Java Embedding activity.

The following image shows how the BPEL process looks now.


Now drag from the arrow on the Receive activity to OdiCallbackSvc. The following dialog is shown. Note that there are only two operations to choose from. ODI inbound web service has callback only for starting a Scenario and restarting a Session. Operations involving Loadplan are always asynchronous, so they do not have callbacks. Client has to poll for the status.


Note that there is only one 'Variable' field and no Input/Output. The Receive activity only only receives data so there is no other field. As with the Invoke activity click the '+' sign to the right of the field and accept the result.


Now we need to assign this received data to the output of the BPEL process. For this double-click the Assign activity after the Receive activity, expand the variable that was created above on the left-hand pane and the outputVariable on the right-hand pane and do mapping.


Choose OK and Save All.

In the Application Navigator right-click the Project and choose to deploy it.


Choose to deploy to an Application Server. This is the SOA managed server that user must already have set up.


Choose Next.


I have chosen to overwrite existing composites with same revision ID. Choose Next.


'SOA-ODI' is the SOA managed server that I have configured. Choose Next.


Now click 'Finish'. It will build and deploy the Project to the SOA server.

Open a web browser and enter the URL for Enterprise Manager on the Weblogic Admin server. Navigate to SOA → soa-infra → ODICallback2SOA. Then from the top SOA Composite menu, choose Test Service → the SOAP service endpoint for the BPEL process.


Be sure to choose the correct endpoint. By default it gets set to OdiInvokeCallback. You do not want this.


Rather choose the BPEL SOAP end point. Enter the required values for ODI Scenario invocation. My Scenario issues a 'beep' and then 'sleeps' for 10 secs.

Click 'Test Web Service' button.


Do not be scared. There was no response because the BPEL process is itself an asynchronous process. Click the Launch Flow Trace button. You will see the following:


For clarity I have removed the sandwiched Java_Embedding1 activity information. If you go to your 'temp' directory and look at the timestamp of 'time.txt' file you will find its timestamp to be same as the ending time for the Invoke1 activity.

Congratulations! You have created a BPEL process that will start off an ODI Session, go on and do some other things while letting the ODI Session run and at the end of the Session, ODI will call the BPEL process back with the Session ID.

Thursday, February 7, 2013

One XSD, multiple XML files

    On occasions users want to define just one XSD (set of XSDs) that define a data structure, but pull data from multiple different XML files concurrently. By applying a twist to a feature of the ODI XML JDBC driver you can accomplish this.

i)   Define an XML data server. Provide the XSD, the schema identifier (this is actually *not* used as a DB schema, but as a prefix to the tables generated for this XSD) and optionally an XML file in the JDBC URL.
ii)  Create Physical and Logical schemas for this Data Server.
iii) Create a Model based on the Logical schema and reverse engineer it.
iv)  Now you have the corresponding Datastores.

    Now comes the magic.

v)  Define a variable that takes its value from the ODI Session ID.
vi) Instead of the schema identifier set in step(i), use this variable eg: jdbc:snps:xml?d=something.xsd&s=#..
vii) Now for loading an XML file create an ODI Procedure that uses the ODI XML Driver's 'LOAD FILE' command. Again you can use an ODI variable as all or part of the XML file name.

So now for each invocation of the ODI Procedure in a Session, you will get an isolated set of DB tables that will store the data from the XML file. Instead of step(vii) you can do this directly in the XML JDBC URL also.

With a little thought this technique can be extended to allow loading multiple XML documents in the same Session using just one XSD definition.

Caveats

Be aware that XML JDBC driver limits the table name length according to the maximum length allowed for the DB. For example assume your DB allows 30 characters as the table name and your XML schema identifier is "SOME_LONG_ID". Then for an element named "thisIsanElementWithALongName", the table name as created in the DB will be "SOME_LONG_ID_THISISANELEMENTWI" (although in your ODI model the Datastore name will be "THISISANELEMENTWI").

Therefore with a dynamic schema identifier you must always limit the dynamic identifier length to the size of your initial identifier in step (i). Otherwise the XML driver will complain about not being able to find the table.

Code generation confusion

Another problem is that when ODI code generation sees a special character (#) in the schema name, it will enclose this schema name prefix in double quotes for all generated SQL statements. XML driver will not recognize such names. In a case where there are no Variables involved, if the value for the s= parameter is TEST, XML driver does not actually create such a DB schema. Instead, it will rewrite the table names so that they all have the prefix TEST_.  It will rewrite all SQL queries that it gets, too. Eg: select * from TEST.TABLE1; changes to select * from TEST_TABLE1. Now take the case of an ODI Variable added as a suffix to the s= value - called VAR1 that then gets resolved to '203' during runtime. The value as XML driver sees it will be "TEST203", including the quotes. When this is used for a SQL statement it becomes select * from "TEST203".TABLE1. XML driver will be unable to process the content within the quotes and the query will remain as it is. It will fail. Therefore you have to be careful using when dynamic XML Dataservers with ODI Interfaces/Mappings where ODI code generation comes into play.

So is that it?

Another way would be to keep same s= parameter value but set use the 'standalone=true' parameter. This has the effect of creating an isolated instance of the Dataserver where name collisions will not happen. There are two drawbacks to this approach
  1. Only the internal HSQL DB can be used. That means your XML data is going to reside in-memory.  This is going to impact te JVM in which the Agent is running.
  2. For each connection instance a new instance of HSQL DB itself is created. This gives additional memory overhead. Another related problem is that instances of HSQL DB may stay around. So your XML Dataserver must define an On Disconnect command sending the SHUTDOWN command to HSQL.
So what can we do to have dynamic XML/Complex File Dataservers sharing same XSD, but needing to pull from different XML files? 

Here is what you need to do : change the place where you provide the prefix for the s= parameter. A sample flow is as below:
  • create a global ODI Variable called SCH_NAME with text/alphanumeric value
  • set the refreshing query as select 'TEST_<% odiRef.getSession("SESS_NO") %>' from dual; So we are getting the Variable refresh itself to do the prefixing.
  • Now set the value of the s= parameter as #GLOBAL.SCH_NAME
  • Set the same value (#GLOBAL.SCH_NAME) as the schema and work schema in the associated Physical Schema.
Now when the SQL gets to the XML driver, it will look like  select * from TEST_4001.TABLE1; Notice the absence of quotes. This is because the code interpretation engine noticed that the entire name before variable substitution is actually referring to the name of a Variable and did not put any quotes around it.

Complex File technology and pre Java 7 bug

Problem statement


How many times have you tried to use a user-defined file structure using Native Format and registered it with ODI Topology as a Complex File Data server - only to have it fail when testing the connection with an error saying :

ORABPEL-11100

Translation Failure.
[Offset=7] Translation from native failed. For input string: "...............".
The incoming data does not conform to the NXSD schema. Please correct the problem.

Well, it could be problem with the input data, but if you are absolutely sure that your data is conformant with the XSD you have created (btw you can use commandline to check this : see here) then there is one thing you can look for : in the error message does the reported string start with "+" and is the datatype for this element as defined in the XSD xsd:long?

If you can say yes to all of this then congratulations! You have been bitten by a Java bug tht has been fixed in Java 7 onwards. The bug is in Java's Long.valueOf where the code only checks for "-" and not "+". So when it finds "+" in there it throws a NumberFormatException. This exception however gets swallowed up and the impression that is created is that it is the fault of the data in the file.

Solution

If you are using ODI 11.1.1.5.0, tough luck! With ODI 11.1.1.6.x, you will need to set up a standalone or JEE agent. These agents must run using Java 7. For standalone agent edit /oracledi/agent/bin/odiparams.sh/bat where ODI_JAVA_HOME will point to your Java location. For JEE agent when you are configuring the domain choose a Java 7 installation. Then for 'test connection' use this agent. For reverse engineering choose 'Customized' rather than 'Standard' on the reverse engineering finger tab and also choose this agent. All ODI Sessions that use this data server must execute on this agent.

Monday, October 8, 2012

Oracle Data Integrator startscenremote.sh : wolf in sheeps clothing?

ODI 11g has a command-line tool called startscenremote.sh (it is not available on Windows). It allows users to provide command-line parameters that are wrapped up into a SOAP message and sent to ODI public web service to start off an ODI scenario. It is understandable that developers will find this useful, but be cautious! It hides a pretty nasty bug.
When you want to pass multiple ODI variable values to your Scenario, the SOAP message asks you to use:


     string
     string


So for each ODI variable you have to add one element. Eg:


  name-01
  value-01


  name-02
  value-02


    However startscenremote.sh will only pass in the first ODI variable. This is because it creates a structure like :


     name-01
     value-01

     name-02
     value-02

     name-03
     value-03


In any case if you are tempted to use this shell script remember that a better option will always be to use an ODI Package that contains an OdiStartScen step. The tools are tightly integrated into ODI ecosystem and will always give you better diagnosability and traceability

Friday, July 20, 2012

Oracle Data Integrator On Connect and XML/LDAP driver

Oracle Data Integrator 11.1.1.5.0 onwards introduces a very useful feature called 'On Connect' and 'On Disconnect'. These are SQL queries that are run on the JDBC connection obtained from the Data Server when the connection is created or closed respectively. See http://docs.oracle.com/cd/E21764_01/integrate.1111/e12643/setup_topology.htm#BGBBCAEH for instructions on how to do this and also limitations on its usage.

ODI comes along with a set of special JDBC drivers that allow users to connect to and use XML/LDAP sources as JDBC sources. The interesting thing to note here is that 'On Connect'/'On Disconnect' SQL commands can be executed on these JDBC connections also. The magical part is that the SQL commands that you enter here - if they are not XML driver commands - will get pushed down to the underlying DB and will be actually executed by the underlying DB. This statement is, in fact, true for any SQL command that you execute on an XML/LDAP Data Server. In case of XML driver, if your command is one of the XML driver commands (listed here : http://docs.oracle.com/cd/E23943_01/integrate.1111/e12644/appendix_xml_driver.htm#CHDFDFJF) then it is intercepted and executed by the driver itself. Otherwise all commands are actually executed on the underlying DB.

Now there is one wrinkle that you need to be aware of when executing 'On Connect' commands on XML/LDAP drivers. As you may be already aware these drivers create/drop tables and indexes and also populate the tables. Parts of this are controlled by properties that you set on the JDBC URL or as property of the Data Server eg: create_indexes for XML driver and load_mode for LDAP driver.


Here is how 'On Connect' would work for a plain DB JDBC connection
  1. You provide a SQL for 'On Connect'
  2. ODI asks the DB's JDBC driver for a JDBC connection.
  3. DB's JDBC driver returns a JDBC connection.
  4. ODI executes the SQL that you provided for On Connect on this connection
  5. Now ODI uses this connection to handle your Procedure commands.

Now here is how it works for XML/LDAP
  1. You provide a SQL for On Connect
  2. ODI asks XML/LDAP JDBC driver for a connection. The connection URL has XML/LDAP connection parameters
  3. XML/LDAP driver internally obtains a JDBC connection to internal HSQL/external DB.
  4. XML/LDAP driver executes SQL commands that do whatever it is that user has asked it to do via connection properties : truncate tables, drop schema, load data ….
  5. XML/LDAP driver returns an XML/LDAP JDBC connection
  6. ODI executes the SQL that you provided for On Connect on this connection
  7. Now ODI uses this connection to handle your Procedure commands.
The points to note are (3) and (4) in the way it works for XML/LDAP drivers. So if you are providing a SQL for 'On Connect' that you would expect to affect all table/index operations on the underlying DB, do not be surprised if it does not work for the initial operations performed by the XMl/LDAP JDBC drivers.