Showing posts with label Oracle Data Integrator 12c. Show all posts

Friday, January 22, 2016

ODI 12c SSL configuration

SSL configuration in ODI

Prior to 12c ODI was able to use OdiInvokeWebservice tool to access webservices over SSL and also invoke operations on remote ODI Agents over SSL. Late in the 11g release train - by 11.1.1.7.0 - it was also possible to setup an ODI Standalone Agent in SSL mode. But the configurations for all these were a bit confusing, to say the least.

With ODI 12c there was an effort to simplify and unify all the configuration options and also add more flexibility in the SSL configuration.

A rose by any other name

There are multiple Agent configurations, when you really come to think about it. There is Studio Local Agent, Jetty-based Standalone/Collocated Agent and also JEE Agent that runs within WLS. Each of these requires some sort of configuration to be able to call out to HTTP services over SSL or, in the case of Standalone/Collocated Agents, be able to serve requests over SSL. We will look at each of these separately.

Note that Java 'keytool' is your friend for creating/importing/exporting certificates. Read up about its functionality in the standard JDK Javadoc.

Standalone/Collocated Agents over SSL

In order for these Agents to be SSL-enabled the first requirement is that you must edit 'instance.properties' file to set 'PROTOCOL' to 'https'. Then you must provide the location of a keystore file. This location is supplied through the standard Java system property 'javax.net.ssl.keyStore'. It is defined in 'instance.cmd/sh' file. Note that the location of instance.properties file and instance.cmd/sh file are a little peculiar. You will find them under /config/fmwconfig/components/ODI/[/bin].

By default the keystore location points to the domain's demo identitystore. For initial testing you can use this, but be sure to change the location and keystore for any production use. This keystore file must contain the SSL certificate for the server. The next piece of information to provide is the keystore password. The password has to be ODI-encoded password. Use the encode.cmd/sh shell script to convert plaintext keystore password to ODI-encoded format. This value is then to be stored in 'instance.properties' as value of ODI_KEYSTORE_ENCODED_PASS. If the key itself is password-protected this password too must be ODI-encoded and stored as value of ODI_KEY_ENCODED_PASS.

An additional configuration that can be performed is to disable less secure SSL ciphers. This can be done using ODI_EXCLUDED_CIPHERS - also from instance.properties. The names of the ciphers to be excluded are to be provided as a comma-separated list. If Agent has been started at INFO level or more verbose logging and at least one cipher name is set for this property, then you can see a list of ciphers available in the JVM printed out to the log. This list can then be used for further pruning of less-secure ciphers, if necessary.

JEE Agent SSL

In this case no configuration is needed. WLS takes care of SSL transport.

Standalone/Collocated/JEE Agent as SSL client

OdiInvokeWebservice or OdiStartScen tool in ODI Package/Procedure can require SSL configuration if the remote endpoint is only accessible over SSL. For this you need to configure a truststore from where the remote server's SSL certificate may be obtained.

For Standalone/Collocated servers the truststore location and type are to be supplied via the standard 'javax.net.ssl.trustStore' and 'javax.net.ssl.trustStoreType' in 'instance.cmd/sh'. The truststore password is to be supplied as ODI-encoded string set as value of 'ODI_TRUST_STORE_ENCODED_PASS' in 'instance.properties'.

For WLS, the standard Java properties will already be available, but you will need to provide the truststore password by setting 'ODI_TRUST_STORE_ENCODED_PASS' as a system property and its value as the ODI-encoded password string. You can use the domain script or the Managed server script for adding this system property. This does create a limitation that a WLS Managed server having more than one ODI Agent can only support one truststore.

Default WLS truststore location : /server/lib/DemoTrust.jks
Default WLS truststore password : DemoTrustKeyStorePassPhrase
WLS Domain keystore : /security/DemoIdentity.jks

ODI Studio Local Agent as SSL client

Pre-12c you would have had to add the SSL Java system properties as well as the 'ODI_TRUST_STORE_ENCODED_PASS' in odi.conf file. But starting from 12c you can go to Tools -> Preferences -> Credentials to configure your truststore. These will be available as standard Java system properties for Studio Local Agent. In case this does not work you can directly add the SSL system properties and ODI-encoded truststore password in odi.conf.

Thursday, May 15, 2014

Using ODI to create a Complex File

Reading, writing and .............


It is trivial to configure a Complex File dataserver, reverse engineer it and then read data from the datastores. It is a little cumbersome, but no black magic to do the reverse of it. But there seems to be an impression that there is some arcane process involved in writing out a new Complex File. In this post we shall examine the steps needed to write out some data to a Complex File.

First of all let us configure a Complex File dataserver.


As you may see there is nothing fancy. Just to make things a little more interesting I have added the XML driver property 'ldoc=false' (load on connect = false). This gives me control over when data is actually loaded. Now I test the connection and reverse engineer. This leaves me with the model seen below.

Since I want to explicitly load data into this model I need to create an ODI Procedure. Create a new Procedure and add a Task. All that the Task does is load data from the file that is specified in the JDBC URL into the datastores.


In the above screenshot you can see the configuration of the Task. The Technology is set to 'Complex File', the Logical Schema is set to that of the source dataserver that we have set up. The command to execute is the XML driver's SYNCHRONIZE command.

Only Target Command has content. Source Command section is empty for this Task.

Now we are ready for a target. Use the same XSD as the one for the source dataserver and create a new Complex File dataserver. Be sure to choose a different value for the 's=' property in the JDBC URL of this dataserver. Also see that there is no 'f=' property. We only want the bare datastores for the target. Data in it is going to come from the source.


As before, reverse engineer to create a model and datastores. This will result in a structure equivalent to the one for the first dataserver. Note that we are doing it this way just for our convenience. Nothing stops you from using totally different XSDs for the source and target.

Now comes the part of actually populating the target with data. For this create 4 mappings. Each mapping will take care of moving data from one of the source datastores to the corresponding target datastore. Let us look at the first mapping, an in-between mapping and the last mapping.

First mapping:


As you may see, it is very simple. Just the root element from source is mapped to root element of target. I have chosen to use an Oracle dataserver as my staging area, but this is irrelevant.

The LKM and IKM are the default ones - LKM SQL to SQL (Built-in).GLOBAL and IKM SQL Incremental update - with FLOW_CONTROL and TRUNCATE turned off.

In-between mapping:


This is the mapping between CUSTOMERCHOICE datastores of source and target. Again staging area is the Oracle dataserver. KMs are as for the ones in the first mapping.

Last mapping:


The last mapping is the one with ITEMCHOICE.

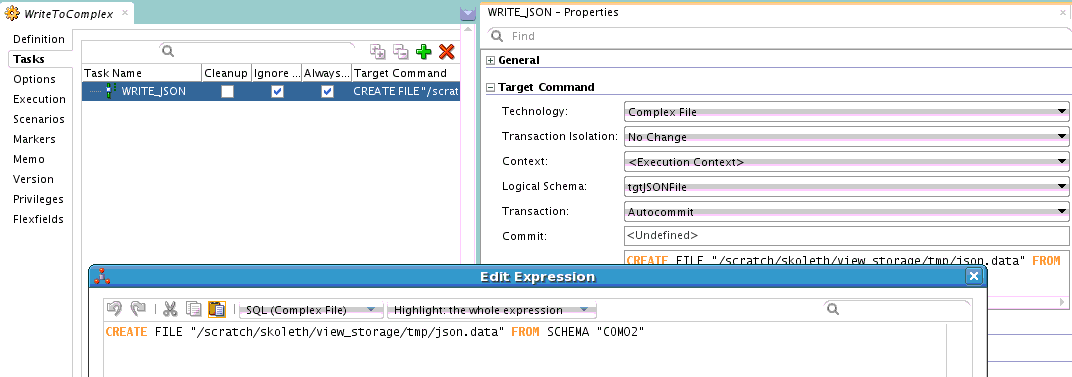
Now we have moved data from source datastores into target datastores. What we need to do next is to push this data out into a complex file. In order to do this we need another ODI Procedure. This time the Procedure Task will use XML driver's CREATE FILE command.

Here is the Procedure Task. As before the Technology is set to 'Complex File' and Logical Schema is set to the target dataserver's logical schema. The command is 'CREATE FILE FROM SCHEMA "COM02" where 'COM02' is the value of the 's=' property set on the JDBC URL of the target dataserver.

Next step is to assemble all these Mappings and Procedures into a control flow. For this we use an ODI Package.

Execute this Package and you will see the data that you loaded into the target datastores written out into a complex file that follows the structure that is defined by the XSD associated with the target dataserver. That is it.

What if .....

One error you might encounter when trying to write out the data is 'Start of root element expected'. This error means that the XML data being written out does not conform to the XSD file that you have used for configuring the Complex File data server. There is no easy way to debug this. But here is something you can try.

Use the XSD file that has been used in the Complex File dataserver to set up an XML dataserver. Create exactly same Interfaces/Mappings and Procedure as you have used for the Complex File creation, but this time using the XML datastores as the targets. Now write out the data and examine it. If the problem is in the root element you can spot it immediately. Otherwise you can use the Native File Format command line to test the generated XML against the XSD. Follow the instructions in this blog post.

Tuesday, December 17, 2013

ODI 12c debugger : row-by-row debugging

ODI is a set-based data processing tool. It does not automatically switch to a row-by-row mode for debugging. But what you *can* do is to use the IKM SQL Incremental Update. This will cause the engine to do row-by-row processing and voila! you can do row-by-row debugging.

Thursday, October 17, 2013

ODI 12c debugger

Debugging ODI is hard

Why is it so hard? Well, the following are a few reasons. ODI has tools such as OdiStartScen that will let an ODI Session launch another ODI Session on a wholly different agent. ODI interfaces (mappings in 12c) can use DB-native utilities for pumping data. This means that ODI does not have a view into the data being transferred. In ODI 12c we have introduced multi-threading in ODI Tasks. This means that like ODI Loadplans, ODI Tasks can be run in serial or parallel mode.

What have we done then?

While designing and implementing the debugger was a blast, it was disheartening to succumb to some limitations. However there are not that many of them. Just to bring it up in front, ODI debugger will let you suspend the execution flow before/after an ODI Step or before/after an ODI Task. Breakpoints can be set on design-time artifacts like Package or Procedure or on runtime artifact - ODI Blueprint.

Know your Sessions

The problem of distributed debugging is solved for the client by ODI detecting a new Session launch that is associated with a parent Session and making the client aware of the same. A caveat here is that the client must be actively debugging the parent Session. Otherwise there is no place for us to send the notification. So the good thing is that the client gets a transparent debugging experience. Don't worry, client has the option to not connect to the child Session. There are options so that even upfront you can say that the child Session is not candidate for debugging. In this case child Session is allowed run on and client cannot debug it.

See my data before or after

Data debugging is  only allowed at the beginning and ending of an ODI Task. The fact that was mentioned earlier viz. ODI may use native utilities to pump data in either direction prevents ODI from providing a transfer-by-transfer data debugging facility. However, for most usecases, the current data debugging facility will be more than sufficient, since at the end of the ODI Task we will be letting the client see uncommitted data. Note that this is a view-only tool. No modification of data is allowed. You may think of this as a limitation, but there is a way around it. ODI Debugger allows JIT modification of code. For example, if you suspend execution before an ODI Task and then modify the code of the Task, you can push that code to the repository. So when ODI gets to the point of actually executing that Task it is your modified code that will get executed. How can this help you? Well, sprinkle some dummy ODI Tasks in your ODI flow. Then when and if you see problems with your data and the next Task is a dummy Task, pause at the beginning of the Task and insert code to modify your data.

ODI threads not Java threads

ODI debugger also transparently takes care of multi-threaded tasks for the client. It provides you with a view of the threads of execution that are tied to the current ODI Session. You can see the execution stack of each of these threads and also open the Session viewer to see the precise point at which the execution has been paused. Right now, if there are multiple threads of execution in a Session and more than one of threads has been paused it is a bit difficult to make out from the Session editor's Blueprint tab as to which suspend point belongs to which thread, but it is a minor point.

See your variables' state

You will also be glad to see a variables view. Historically ODI variables have had a lot of bugs associated with it - be it actual bugs or user perception problem. The debugger can help here to a large extent in that it lets you see the ODI Variables and updates the displayed values as and when they change. Not only that the debugger will even let you dynamically modify the value of the Variable. That should be a pretty powerful tool.

So there you have it - a feature-rich debugger for ODI that should help customers and DW developers immensely.