Monday, February 9, 2015

Creating a JSON file

Oracle Data Integrator and JSON

    Oracle Data Integrator 12.1.3 adds the capability to read and write JSON files. Both of these work through the Complex File dataserver definition of ODI. There does exist one limitation to JSON capability in that the JSON data must have a single root. This is analogous to XML dataserver in that a recurring element cannot be used as the root element.
    In order to specify that the Complex File dataserver is meant to read and write JSON file, a new property has been added to Complex File technology viz. "translator_type" or "tt". For JSON reading and writing the value of this property must be set to "json". For other types of Complex Files do not specify this property at all.
    If the Complex File dataserver has associated with it the XSD generated by Native File Format wizard then there is no need to explicitly provide this property specifying the translator type. If you look into a generated XSD file, it will have an annotation nxsd:version=JSON. For other source formats, the wizard will generate XSD file with annotation nxsd:version=NXSD.
   One more item of interest is that the Complex File dataserver accpets all the commands and properties supported by XML driver. So you can - for intents and purposes - treat Complex File technology as XML technology.

Getting our feet wet


    Let us jump right in and see an example about reading (and writing) a JSON file. Shown below is the JSON that we are going to use as source.
JSON
{
"completed_in": 0.012,
"max_id": 130,
"max_id_str": "136536013832069120",
"next_page": "?page=2&max_id=136536013832069120&q=twitterapi&rpp=1",
"page": 1,
"query": "twitterapi",
"refresh_url": "?since_id=136536013832069120&q=twitterapi",
"results": [
{
"created_at": "Tue, 15 Nov 2011 20:08:17 +0000",
"from_user": "fakekurrik",
"from_user_id": 370,
"from_user_id_str": "370773112",
"from_user_name": "fakekurrik",
"geo": null,
"id": 136,
"id_str": "136536013832069120",
"iso_language_code": "en",
"metadata": {
"result_type": "recent"
},
"profile_image_url": "http://a1.twimg.com/profile_images/1540298033/phatkicks_normal.jpg",
"source": "<a href="http://twitter.com/">web</a>",
"text": "@twitterapi, keep on keeping it real",
"to_user": "twitterapi",
"to_user_id": 62,
"to_user_id_str": "6253282",
"to_user_name": "Twitter API"
}
],
"results_per_page": 1,
"since_id": 0,
"since_id_str": "0"
}

The corresponding XSD file shall be


As you can see it has the attribute nxsd:version="JSON". Also you can see that the XSD has a root element called "tweet". Do not be concerned. This is just an empty holder.

    We shall be using the same XSD for defining source and target Complex File dataservers, but with different value for the "s=" parameter of the dataserver.

    Let us define the source Complex File dataserver. See below the definition.


You can see that the "tt" property is set. This is to clarify the nature of the dataserver. Now create Physical Schema, Logical Schema and a Model for this dataserver. See below the Model and datastores that will get created.


Now create a target Complex File dataserver.


As can be seen the "f=" parameter is not specified. So this dataserver will not have any content. It will only have a shape. Also note the different value given to "s=" parameter. Again create Physical Schema, Logical Schema and Model for this dataserver.


Now that we have the Models created, let us create a Mapping. Create a Mapping with empty dataset. Then multi-select (Ctrl-click) all datastores from "twitter_simple" model. Darg-drop them into the default dataset. Re-arrange them to see all the datastores.

Now multi-select all datastores from "twitter_simple_targ". Darg-drop them outside of the default dataset. Re-arrange them. Create mapping from the dataset to each of the three target datastores. Choose to do auto-mapping in each case. You will end with the following.


Execute this mapping once to verify that there are no errors. No file will be created, so do not look for it. We are just populating data into the target via this Mapping.

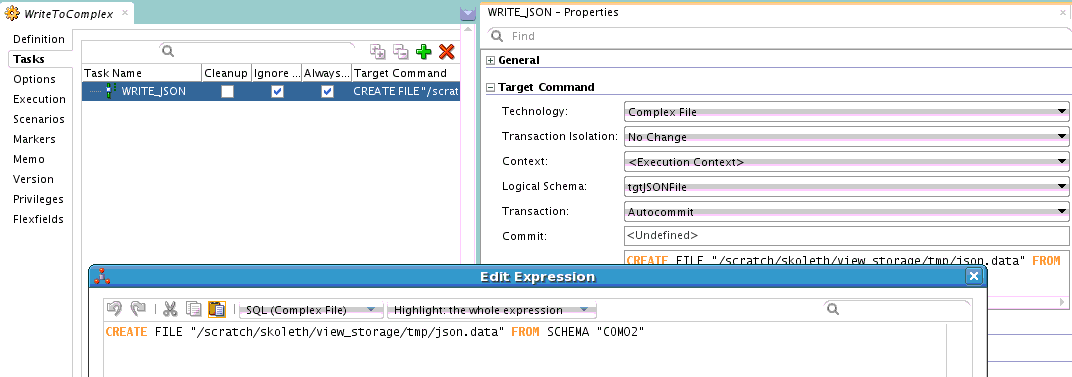
Next step is to actually write out the data into a JSON file. For this we will use a Procedure and the 'CREATE FILE' XML driver command.


The JSON file is being created from the schema of the target Complex File dataserver. Since we want this Procedure to be executed *after* the Mapping, but in the same Session so that we will get the data, we shall put the Mapping and Procedure into a Package.


Execute this Package. The contents of our initial JSON file will get written out to the new JSON file. You will notice that the psuedo-root node "tweet" is absent in the result.

This is a basic example of reading (and writing) JSON file using Oracle Data Integrator. More complex flows can be created and the source/target of data can be changed. The main take-aways should be about the pseudo-root and the fact that Complex File technology works the same way as XML technology and accepts the same properties and commands.

Note:

In the mapping shown  above, all the target tables are in the same mapping. This depends on the Parallel Target Table load feature of ODI and has all its limitations. Please verify that your target tables are indeed capable of being loaded in parallel. Otherwise you will need to create one mapping per XML hierarchy level.

Tuesday, September 23, 2014

New and noteworthy in ODI 12.1.3 XML driver

Rich metadata

One of the most important features added to the XML (and by extension Complex File) driver in Oracle Data Integrator 12.1.3 is support for user-control of generated table names, column names, column datatype, column length and column precision. This is made possible by the user being able to add custom attributes to those elements/attributes whose corresponding relational (and by extension the ODI Datastore) structure they want to control.

Why add this to XSD?
Some users might ask this question. For example, the ODI LDAP driver allows you to specify an 'alias_bundle' where LDAP DN names can be aliased to a more meaningful table name. The down side to this is that it becomes another file that you need to keep and move around according as the location of your Agent that actually performs the execution.

Details about this feature can be found in the XML driver documentation here. However here are couple of tips that will be of use.
  • XML driver creates tables for complex elements as well as elements of simple type with maxOccurs > 1. In the latter case a table is created for the element and the data in each of the element instances in the XML is stored in a column with the name '_DATA'. If user wants to control the datatype, length or precision of this column, user can go ahead and add column metadata to this element.
  • Tables cannot store data from multiple elements. Suppose you have a global element of complex type or maxOccurs > 1 in your XSD and also more than one place in your XSD where this element is used via 'ref'. In this case you cannot control the table name for this element.

Recursion support

Until 12.1.3, compat_mode=v3 mode did not support recursive XML structures. If user supplied an XSD with recursive structure, it would result in an exception that said in effect 'recursion not supported'. From 12.1.3 onwards the driver supports recursion. More information may be found in this post.

ODI XML driver and recursion

The serpent Set swallowing its tail


Most well-designed XSDs avoid recursion. But certain XSDs that are generated by frameworks or by naive Object hierarchy to XML hierarchy conversion tools make heavy use of recursion. In the v2 mode of XML driver this was handled in a spotty manner. Relational structures get created, but data may or may not be populated properly. Some element data may disappear altogether. The v3 mode driver that was introduced in ODI 11.1.1.7.0 and made the default in ODI 12.1.2 uses element xpath to uniquely identify an element. This causes a problem with recursion since each recursion occurrence is a unique xpath and will lead to creation of a new table ad infinitum. This will result in a StackOverflowError. To avoid this, 11.1.7.0 and 12.1.2 XML drivers raise error when recursion is detected.

Breaking the chains


It is obvious that avoiding recursion is not the answer. Hence in ODI 12.1.3 recursion support was added to v3 mode. Broadly speaking there are two types of recursion - self-recursion and multi-element recursion. An example for self-recursion is /CustomerOrder/Order/Order. Multi-element recursion - which is more common - can be exemplified by /CustomerOrders/Order/Return/Order.

XML driver breaks the recursion loop by first detecting the recursion and then identifying the recursion head and recursion tail. For self-recursion, recursion head == recursion tail. In the multi-element recursion above, the recursion head is /CustomerOrders/Order and the recursion tail is /CustomerOrders/Order/Return. Once this information has been identified no further exploration of this hierarchy is performed. /CustomerOrders/Order table will hold the data from all the recursion descendants of 'Order' type and /CustomerOrders/Order/Return table will hold reference to the data for all the recursion descendants of 'Order' type.

So one thing a user may expect with recursion is that even if your XML data has, say 100 levels of recursion, the XML datastores will only have one level representing this whole recursion hierarchy. The driver takes care of folding in and unfolding out the XML data as it is read in or written out. However, if user wants to perform a mapping from or to such a datastore, then they need to make sure that they pay attention to the PK-FKs on the tables so that the mappings to or from different recursion levels do not overlap.  For self-recursion, the ORDER table will have, as usual, an ORDERPK column. In addition it will also have an ORDERFK column. An Order element having an Order child will have the child element's PK reference in the ORDERFK column. In a similar manner, for the multi-element recursion example, RETURN table will have an ORDERFK column that will contain reference to Order children of Return.


Thursday, May 15, 2014

Using ODI to create a Complex File

Reading, writing and .............


It is trivial to configure a Complex File dataserver, reverse engineer it and then read data from the datastores. It is a little cumbersome, but no black magic to do the reverse of it. But there seems to be an impression that there is some arcane process involved in writing out a new Complex File. In this post we shall examine the steps needed to write out some data to a Complex File.

First of all let us configure a Complex File dataserver.


As you may see there is nothing fancy. Just to make things a little more interesting I have added the XML driver property 'ldoc=false' (load on connect = false). This gives me control over when data is actually loaded. Now I test the connection and reverse engineer. This leaves me with the model seen below.

Since I want to explicitly load data into this model I need to create an ODI Procedure. Create a new Procedure and add a Task. All that the Task does is load data from the file that is specified in the JDBC URL into the datastores.


In the above screenshot you can see the configuration of the Task. The Technology is set to 'Complex File', the Logical Schema is set to that of the source dataserver that we have set up. The command to execute is the XML driver's SYNCHRONIZE command.

Only Target Command has content. Source Command section is empty for this Task.

Now we are ready for a target. Use the same XSD as the one for the source dataserver and create a new Complex File dataserver. Be sure to choose a different value for the 's=' property in the JDBC URL of this dataserver. Also see that there is no 'f=' property. We only want the bare datastores for the target. Data in it is going to come from the source.


As before, reverse engineer to create a model and datastores. This will result in a structure equivalent to the one for the first dataserver. Note that we are doing it this way just for our convenience. Nothing stops you from using totally different XSDs for the source and target.

Now comes the part of actually populating the target with data. For this create 4 mappings. Each mapping will take care of moving data from one of the source datastores to the corresponding target datastore. Let us look at the first mapping, an in-between mapping and the last mapping.

First mapping:


As you may see, it is very simple. Just the root element from source is mapped to root element of target. I have chosen to use an Oracle dataserver as my staging area, but this is irrelevant.

The LKM and IKM are the default ones - LKM SQL to SQL (Built-in).GLOBAL and IKM SQL Incremental update - with FLOW_CONTROL and TRUNCATE turned off.

In-between mapping:


This is the mapping between CUSTOMERCHOICE datastores of source and target. Again staging area is the Oracle dataserver. KMs are as for the ones in the first mapping.

Last mapping:


The last mapping is the one with ITEMCHOICE.

Now we have moved data from source datastores into target datastores. What we need to do next is to push this data out into a complex file. In order to do this we need another ODI Procedure. This time the Procedure Task will use XML driver's CREATE FILE command.

Here is the Procedure Task. As before the Technology is set to 'Complex File' and Logical Schema is set to the target dataserver's logical schema. The command is 'CREATE FILE FROM SCHEMA "COM02" where 'COM02' is the value of the 's=' property set on the JDBC URL of the target dataserver.

Next step is to assemble all these Mappings and Procedures into a control flow. For this we use an ODI Package.

Execute this Package and you will see the data that you loaded into the target datastores written out into a complex file that follows the structure that is defined by the XSD associated with the target dataserver. That is it.

What if .....

One error you might encounter when trying to write out the data is 'Start of root element expected'. This error means that the XML data being written out does not conform to the XSD file that you have used for configuring the Complex File data server. There is no easy way to debug this. But here is something you can try.

Use the XSD file that has been used in the Complex File dataserver to set up an XML dataserver. Create exactly same Interfaces/Mappings and Procedure as you have used for the Complex File creation, but this time using the XML datastores as the targets. Now write out the data and examine it. If the problem is in the root element you can spot it immediately. Otherwise you can use the Native File Format command line to test the generated XML against the XSD. Follow the instructions in this blog post.

Thursday, April 24, 2014

ODI JMS driver IKMs in 12c

IKM...LKM...knowledge!


ODI has the concept of knowledge modules that encapsulate and re-use the heavy lifting logic required for data movement. There are several KMs authored targeting different data sources. A big shift occurred in the world of ODI data flow control by the introduction of flow-based mapping in 12c. This component obviated many of the limitations imposed by ODI Interfaces in pre-12c days. 12c also introduced the concept of component KMs and global KMs. When desinging a mapping, most of the time an appropriate component KM gets chosen by default - whether it be for loading or integration.

JMS....JMS..wherefore art thou JMS


A pretty significant gotcha crept in for the particular case of JMS or JMS XML as target. If you design a mapping with a datastore from these technology types as target then you know that for the data to be actually sent to the JMS Queue/Topic you need to choose the JMS-specific IKM. Here lies the catch. Although you may have imported the IKM into your project when you go to the target datastore configuration to set the IKM you may not find it there. If this happens to you check the LKM that is being used. The JMS-specific IKMs are designated as multi-connect KMs and in ODI 12c if you want to use a multi-connect IKM then your LKM must also be multi-connect.
So the solution is to switch your LKM to one of the multi-connect component KMs or template KMs.

If you see similar symptoms with other KM combinations remember this : check your KM to see if they are multi-connect.

Tuesday, December 17, 2013

ODI 12c debugger : row-by-row debugging

ODI is a set-based data processing tool. It does not automatically switch to a row-by-row mode for debugging. But what you *can* do is to use the IKM SQL Incremental Update. This will cause the engine to do row-by-row processing and voila! you can do row-by-row debugging.

Wednesday, December 4, 2013

ODI debugger - Part 2

Descendant Sessions debugging

In ODI one Session can launch a child Session in different ways.
  1. user can have an OdiStartScen tool invocation either in Package or Procedure
  2. user can have an OdiInvokeWebService invocation either via Package or Procedure
  3. user can have an OSCommand or OdiOSCommand tool invocation calling startscen.sh/cmd or restartsess.sh/cmd either in Package or Procedure
ODI debugger will notify the client about debuggable child Sessions start only in case (1). In this case you need to be aware of one fact. Child Sessions inherit debug flags set on the parent Session unless they are explicitly overridden by debugger properties set on OdiStartScen. So if parent Session has the flags DEBUGGABLE=true and DEBUG_DESCENDANT_SESSIONS=true set, then any child Session would be automatically debuggable and *its* children would be debuggable and would start any of their child Sessions also in debuggable mode. This gives the user a very flexible debug configuration. User may want to launch the root Session in non-debuggable mode, but have a specific child Session debuggable. Or they might want it the other way, some children to be debuggable while others are not.

There is another subtle gotcha. When ODI Studio notifies you that a child Session is starting, if user chooses not to attach Studio to that debuggable Session, then user *will not receive any notifications for any debuggable child Sessions started by this child Session*

Starting Session in debug mode


All the ways for starting a Session have debugger flags that user may set. This includes startscen.sh/cmd, restartsess.sh/cmd, ODI incoming web service (a.k.a public web service), OdiStartScen tool, SDK APIs and Studio.